
IMAGE
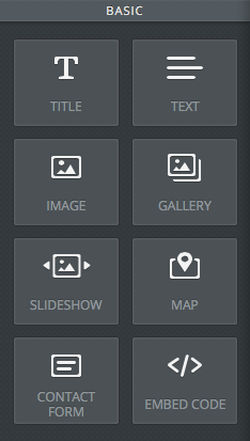
To Add an Image in a content area, drag and drop the Image button into the space on your site where you want a photo. Click Upload Image. The upper bar that will appear has options of where to obtain photos to upload.
My Computer lets you choose a photo from your computer. Choose a photo from the folders on your hard drive and click open. To grab a photo off a website and keep it on your PC, right click on the photo online (or press CTRL while clicking on the photo), then click Copy Image. Paste the photo into your computer’s photo folder and upload it from there. On a Mac, you can click on a photo you want from a different website and drag it onto your desktop.
Search leads to royalty free stock photos for purchase or free Creative Commons license photos that add an attribution link to your website footer. Here is a link to Weebly's How To Use Professional or Free Stock Photos
Favorites are photos you marked as “favorite” during any previous Searches
Image URL lets you insert a photo currently online with its URL address. I don’t recommend this because if the photo is removed from the site to which you are linking, it will leave a gap on your website.

To alter an image that already exists, click on the photo to make the editing toolbar appear. From here, you can…
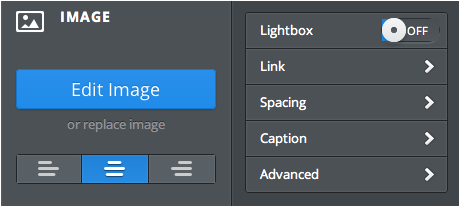
Edit the image: Click Edit Image, to crop, rotate, change opacity, fade level, and add effects. Be sure to press Save when you are done.
Replace the image: Click “Replace Image” and repeat the same instructions used to upload a photo.
Change image size: Grab the little blue box at the right bottom corner of photo and drag to the preferred size. Sometimes it is unavailable, but you can click “Edit Image” to resize instead if this happens.
Align image differently: Align Center, Left or Right by clicking the buttons below the words Replace Image. The button on the left aligns the photo to the left, center is center, right is right.
Add image to a block of text: Drag an image right on to (or out of) a block of text. This allows the text to wrap around it.
Change the amount of space surrounding the photo:
Add a caption: To add text that is closely placed below a photo, click “Caption” and write the text. When done, click the arrow on the left to save and return to the tool bar.
Change border width: (First check your Personal Reference Sheet to see if these should not be altered for site continuity) Click Advanced, then either None, Thin, Medium, Thick
Change border color: (First check your Personal Reference Sheet to see if these should not be altered for site continuity) Click Advanced, then either Gray or Black
Add a file name to improve SEO: Click Advanced, in the box for “Alt Text”, label the photo with an accurate, truthful description that will lead people to your site
To edit a Header image, click here
Here is a link to Weebly's How to Upload and Edit and Image
Here is a link to Weebly's How to Upload and Edit and Image
